---
author: Alvie Rahman
date: \today
tags:
- uni
- nottingham
- mmme1028
- maths
- statics
- dynamics
title: MMME1028 // Statics
---
# Lecture L1.1, L1.2
### Lecture L1.1 Exercises
Can be found [here](./lecture_exercises/mmme1028_l1.1_exercises_2021-09-30.pdf).
### Lecture L1.2 Exercises
Can be found here [here](./lecture_exercises/mmme1028_l1.2_exercises_2021-10-04.pdf)
## Newton's Laws
1. Remains at constant velocity unless acted on by external force
2. Sum of forces on body is equal to mass of body multiplied by
acceleration
> 1st Law is a special case of 2nd
3. When one body exerts a force on another, 2nd body exerts force
simultaneously of equal magnitude and opposite direction
## Equilibrium
- Body is in equilibrium if sum of all forces and moments acting on
body are 0
### Example
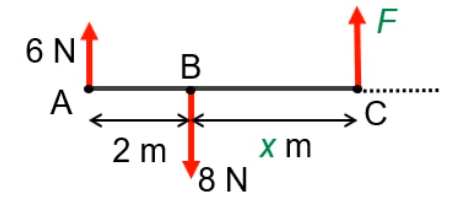
Determine force $F$ and $x$ so that the body is in equilibrium.
1. Check horizontal equilibrium
$\sum{F_x} = 0$
2. Check vertical equilibrium
$\sum{F_y} = 8 - 8 + F = 0$
$F = 2$
3. Take moments about any point
$\sum{M(A)} = 8\times{}2 - F(2+x) = 0$
$F(2+x) = 16)$
$x = 6$
## Free Body Diagrams
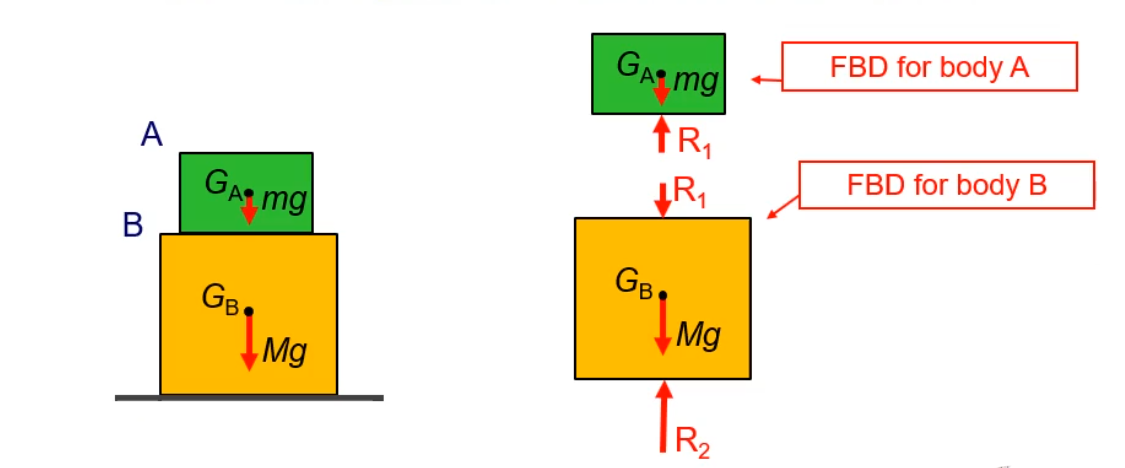
A free body diagram is a diagram of a single (free) body which shows all
the external forces acting on the body.
Where there are several bodies or subcomponents interacting as a complex
system, each body is drawn separately:
## Friction
- Arises between rough surfaces and always acts at right angles to the
normal reaction force ($R$) in the direction to resist motion.
- The maximum value of friction $F$ is $F_{max} = \mu{}R$, where
$\mu{}$ is the friction coefficient
- $F_{max}$ is also known as the point of slip
## Reactions at Supports
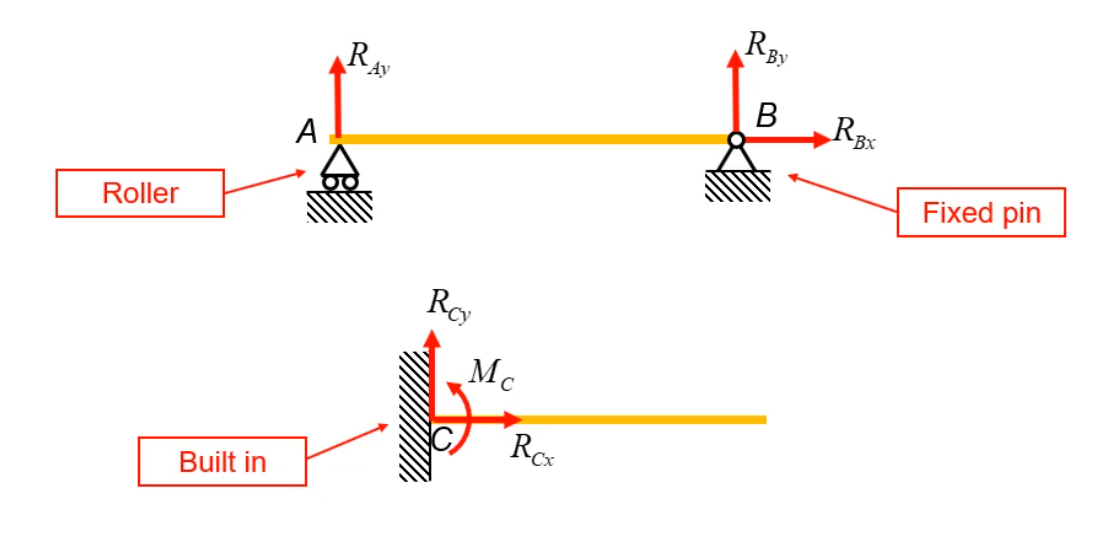
There are three kinds of supports frequently encountered in engineering
problems:
## Principle of Force Transmissibility
A force can be move dalong line of action without affecting equilibrium
of the body which it acts on:

This principle can be useful in determining moments.
## Two-Force Bodies
- If a body has only 2 forces, then the forces must be collinear,
equal, and opposite:
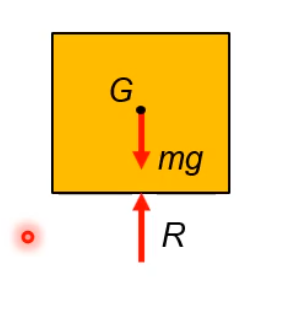
> The forces must be collinear so a moment is not created
## Three-Force Bodies
- If a body in equilibrium has only three forces acting on it, then
the lines of actions must go through one point:
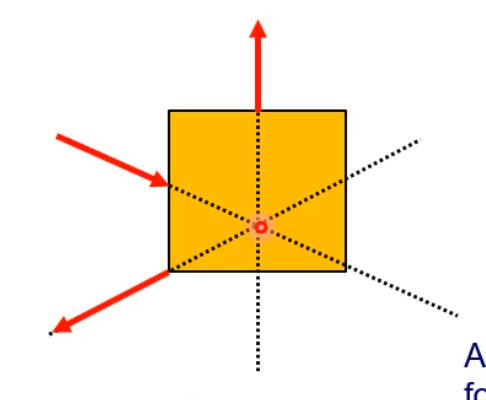
> This is also to not create a moment
- The forces must form a closed triangle ($\sum{F} = 0$)
## Naming Conventions
| Term | Meaning |
|----------------------|----------------------------------------------------------|
| light | no mass |
| heavy | body has mass |
| smooth | there is no friction |
| rough | contact has friction |
| at the point of slip | one tangential reaction is $F_{max}$ |
| roller | a support only creating normal reaction |
| rigid pin | a support only providing normal and tangential reactions |
| built-in | a support proviting two reaction components and a moment |
## Tips to Solve (Difficult) Problems
1. Make good quality clear and big sketches
2. Label all forces, dimensions, relevant points
3. Explain and show your thought process---write complete equations
4. Follow standard conventions in equations and sketches
5. Solve everything symbolically (algebraicly) until the end
6. Check your answers make sense
7. Don't forget the units
# Lecture L1.4
## Tension and Compression
- The convention in standard mechanical engineering problems is that positive values are for
tension and negative values for compression
- Members in tension can be replaces by cables, which can support tension but not compression
- Resisting compression is harder as members in compression can buckle
## What is a Pin Joint?
- Pin jointed structures are structures where joints are pinned (free to rotate)
- Pin joints are represented by a circle (pin) about which members are free to rotate:
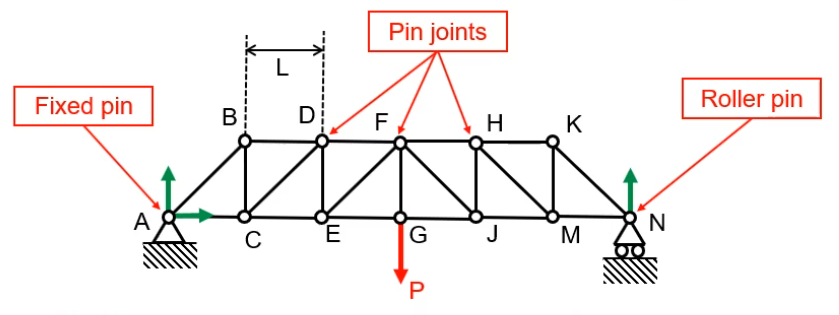
- A pin joint transmits force but cannot carry a moment
## What is a Truss?
- Trusses are an assembly of many bars, which are pin jointed in design but do not rotate due to
the geometry of the design. A pylon is a good example of this
- Trusses are used in engineering to transfer forces through a structure
- When pin jointed trusses are loaded at the pins, the bars are subjected to pure tensile or
compressive forces.
These bars are two force members
## Equilibrium at the Joints
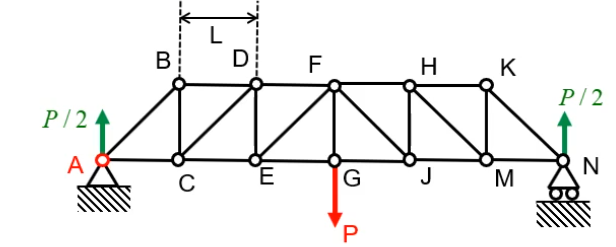
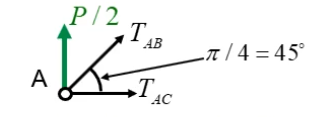
### Forces at A
$$\sum F_y(A) = \frac P 2 + T_{AB}\sin{\frac \pi 4} = 0 \rightarrow T_{AB} = -\frac P 2$$
\begin{align*}
\sum F_x(A) &= T_{AB}\cos{\frac pi 4} + T_{AC} = 0 \\
T_AC &= -\frac{-P} 2 \times \frac{\sqrt{2}} 2 = \frac P 2
\end{align*}
### Forces at B
Add the information we just obtained from calculating forces at A:
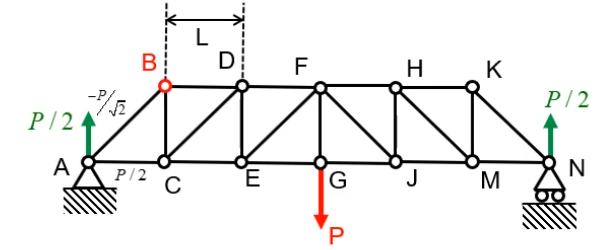
And draw a free body diagram for the forces at B:
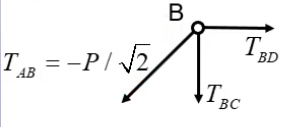
$$
\sum F_y(B) = -\frac{-P} 2 \sin{\frac \pi 4} - T_{BC} = 0 \rightarrow
T_{BC} = \frac P {\sqrt 2} \times \frac {\sqrt 2} 2 = \frac P 2
$$
\begin{align*}
\sum F_x(B) &= -\frac{-P}{\sqrt2}\cos{\frac \pi 4} + T_{BD} = 0 \\
T_{BD} &= -\frac P 2
\end{align*}
## Symmetry in Stuctures
Symmetry of bar forces in a pin jointed frame depends on to aspects:
1. Symmetry of the stucture
2. Symmetry of the loading (forces applied)
Both conditions must be met to exploit symmetry.
# Lecture L1.5, L1.6
## Method of Sections
The method of sections is very useful to find a few forces inside a complex structure.
If an entire section is in equilibrium, so are discrete parts of the same structure.
This means we an isolate substructures and draws free body diagrams for them.
We must add all the forces acting on the substructure.
Then we make a virtua cut through some of the members, replacing them with forces.
Then we can write 3 equilibrium equations for the substructure:
1. 1 Horizontal, 1 vertical, and 1 moment equation
2. Either horizonal or vertical and 2 moment equations
3. 3 moment equations
### Example 1
Draw a virtual cut through the structure, making sure to cut through all the bars whose forces
you are trying to find:
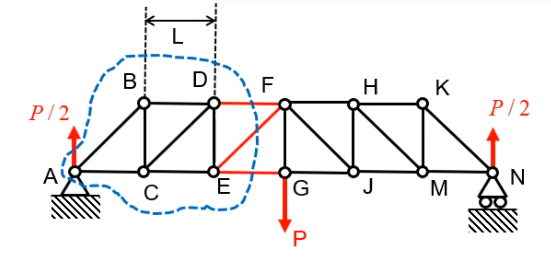
Draw the free body diagram, substituting cut bars by forces:
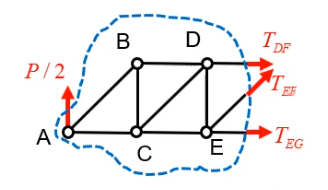
As there are three unknown forces, we need three equilibrium equations.
#### First Equation: Moments about E
\begin{align*}
\sum M(E) &= \frac P 2 \times 2L + T_{DF}L = 0 \\
T_{DF} &= -P
\end{align*}
#### Second Equation: Vertical Equilibrium
\begin{align*}
\sum F_y &= \frac P 2 + T_{EF}\sin{\frac \pi 4} = 0 \\
T_{EF} &= -\frac P {\sqrt2}
\end{align*}
#### Third Equation: Horizontal Equilibrium
\begin{align*}
\sum F_x = T_{DF} + T_{EF}\cos{\frac \pi 4} + T_{EG} = 0 \\
T_{EG} = \frac {3P} 2
\end{align*}
#### Taking Moments from Outside the Structure
If we only needed EG, we could have taken moments about point F, outside our substructure:
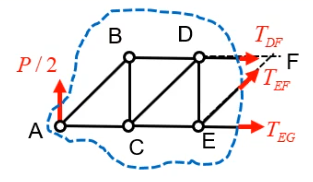
\begin{align*}
\sum M(F) &= \frac P 2 \times 3L -T_{EG}L = 0 \\
T_{EG} &= \frac {3P} 2
\end{align*}
## Zero-Force Members
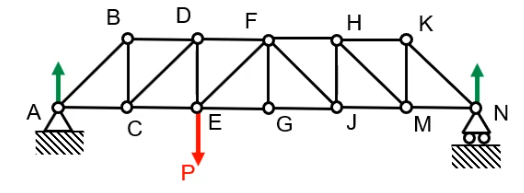
Consider the free body diagram for the joint at G:
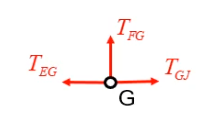
$$\sum F_y(G) = T_{FG} = 0$$
$$\sum F_x(G) = -T_{EG} + T_{GJ} = 0 \rightarrow T_{EG} = T_{GJ}$$
Meaning that the structure is effecively the same as this one:
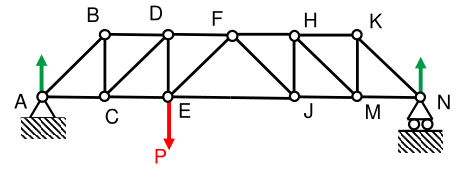
Why was it there?
- The structure may be designed for other loading patterns
- The bar may prevent the struture from becoming a mechanism
- A zero force member may also be there to prevent buckling
## Externally Applied Moments
Externally applied moments are dealt with in the same way as external forces, but they only
contribute to moment equations and not force equilibrium equations.
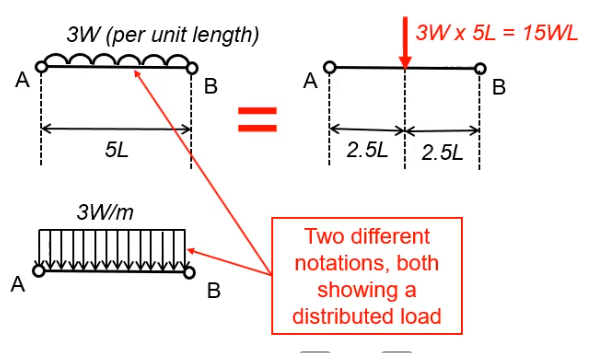
## Distributed Load
A distriuted load is applied uniformly to a bar or section of a bar.
It can be represented by a single force through the midpoint its midpoint.
### Example 1
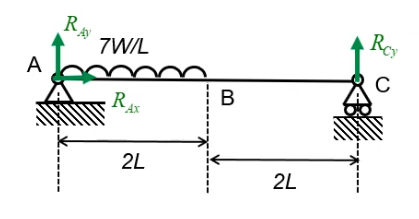
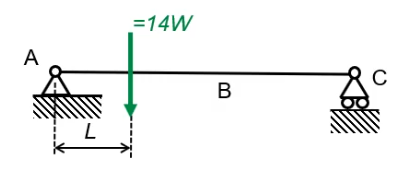
Is equivalent to:
## Equivalent Loads
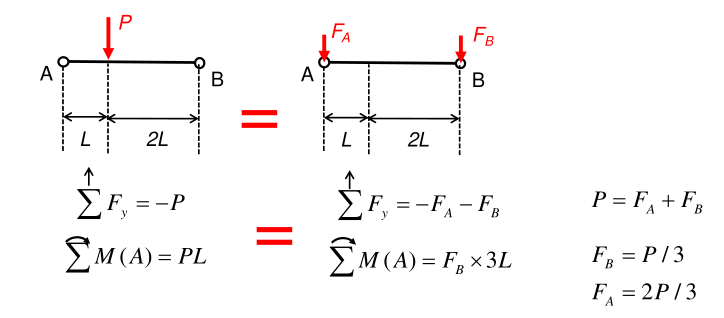
When loads are applied within a bar, as far as support reactions and bar forces in *other* bars
are concered, we can determine *equivalent node forces* using equilibrium
# Lecture L1.6
### Example 1
The figure shows a light roof truss loaded by a force $F = 90$ kN at 45\textdegree to the horizontal
at point $B$.
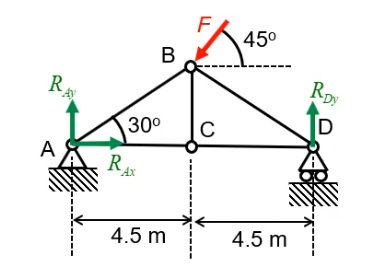
a. Find the reaction forces at A and D using equilibrium applied to the whole structure.
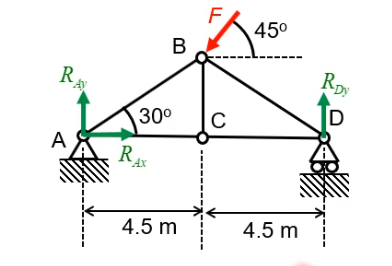
> 1. Add unknown quantities to the diagram
>
> 
>
> 2. Consider the number of unknowns --- there are 3 therefore 3 equations are needed
> 3. Decide which equilibrium equation to start with
>
> Horizontal equilibrium:
>
> \begin{align*}
\sum F_x &= R_{Ax} - F\cos45 = 0 \\
R_{Ax} &= 63.6\text{ kN}
> \end{align*}
>
> Vertical equilibrium:
>
> \begin{align*}
\sum F_y &= R_{Ay} + R_{Dy} - F\sin = 0 \\
R_{Ay} + R_{Dy} &= \frac{\sqrt2 F} 2
> \end{align*}
>
> Moment equation:
>
> \begin{align*}
> \sum M_{xy}(B) &= 4.5R_{Ay} - 4.5R_{Dy} - L_{BC}R_{Ax} = 0 \\
> \frac{L_{BC}}{4.5} &= \tan30 = \frac 1 {\sqrt3} \rightarrow L_{BC} = 2.6 \\
> \end{align*}
>
> 4. Solve for $R_{Ay}$
>
> \begin{align*}
> 4.5R_{Ay} &= 4.5R_{Dy} + 2.6\times\frac{\sqrt2 F}{2} & R_{Dy} = \frac{\sqrt2 F}{2} - R_{Ay} \\
> 4.5R_{Ay} &= 4.5\left(\frac{\sqrt2 F}{2} - R_{Ay}\right) + 2.6\times\frac{\sqrt2 F}{2} \\
> R_{Ay} &= 0.56F = 50.2\text{ kN}
> \end{align*}
>
> 5. Substitute to find $R_{Dy}$
>
> \begin{align*}
> R_{Dy} = \frac{\sqrt2 F}{2} - R_{Ay} = (0.71-0.56)F = 13.3\text{ kN}\\
> \end{align*}
b. Use the graphical/trigonometric method o check your answer.
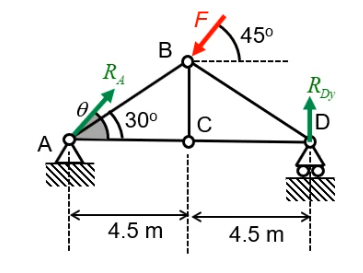
> Write the reaction at A as a single force with unknown direction:
>
> 
>
> When three forces act on an object in equilibrium, they must:
>
> 1. Make a triangle of forces
> 2. Go through a single point
>
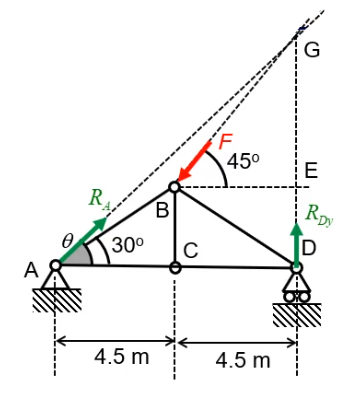
> So we can figure out the angle of $R_{A}$ by drawing it such that all the lines of action of
> all forces go through the same point:
>
> 
>
> \begin{align*}
L_{DE} &= L_{BC} = 2.6 \\
L_{EG} &= \tan45\times L_{BE} = 4.5 \\
L_{DE} &= 2.6+4.5 = 7.1 \\
\\
\tan\theta &= \frac{L_{DG}}{L_{AD}} = 0.79 \\
\theta &= 38.27
> \end{align*}
>
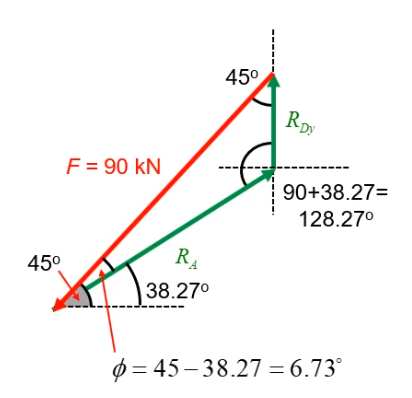
> Now draw the force triangle:
>
> 
>
> Using the sine rule we find out $R_A$ and $R_{Dy}$, which are $81.1$ kN and $13.4$ kN,
> respectively.
>
> Now we can check our answers in part (a) and (b) are the same:
>
> - $R_{Dy} = 13.4$
> - $R_{Ax} = 81.1\cos38.27 = 63.6$
> - $R_{Ay} = 81.1\sin.27 = 50.2$
>
> The methods agree.